


Available since JD Edwards EnterpriseOne (JDE) version 9.2.0.2, Orchestrator Studio has evolved much since its beginnings. Yet today we have a mature and resourceful tool just waiting to be harnessed.
In this step-by-step article, we will show an integration example using Orchestrator. By the end, you will benefit from basic notions for a fully functional integration. The simplest and most learner-friendly method for this tool is, in my opinion, the baby steps. Baby steps both in terms of project importance and project execution. We will build the integration brick by brick while making sure each level is completed before going to the next. It may seem lengthy at first, but in the context of a large-scale orchestration project, it is a rather short method.
For our first integration, we will start by quarantining items received from credit notes. In general, we want to inspect and control goods returned by our customers prior to putting them back in inventory.
Scenario
Create a new integration that will change the status of a lot number received via the P4205 program for a merchandise return (credit). The orchestration will be initiated after the return transaction and will be linked to the application through the Form Extension feature. The integration will check if the item or lot received is in the RE.TUR.N location, and if the lot status is set at “Q.” If not, the integration will change the lot’s status to “Q” (Quarantine). This method enables easy addition of features to JDE forms without modification to the original code of the application.
Concepts introduced:
- Process Recorder
- Form Request
- Orchestration
- Rules
- Data Request
Process Description:
- Carry out the reception (Credit) in P4205.
- Click on the "OK" button to initiate the orchestration. Pass the item number and lot number onto the orchestration.
- The orchestration starts and checks if the item and lot numbers are in the RE.TUR.N. location. If so, call on the Form Request feature to update the lot status.
Before you begin, make sure your administrator has granted you all the rights to use Orchestrator.
To begin, let’s create an orchestration using Data Request. We will then record the change of status using application P4108. Finally, we will bring together all the pieces of our integration.
Creating the Orchestration
Click on the Orchestration tile and click on the New button.
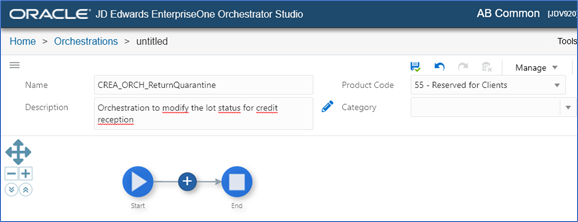
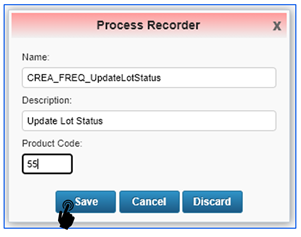
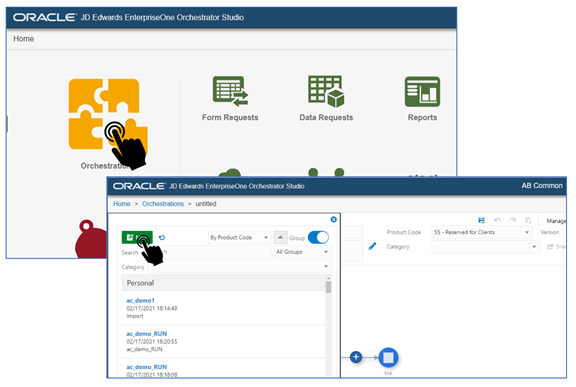 Enter the name of the orchestration, a short description and a product code. We typically leave “55 – Reserved for Clients” and save.
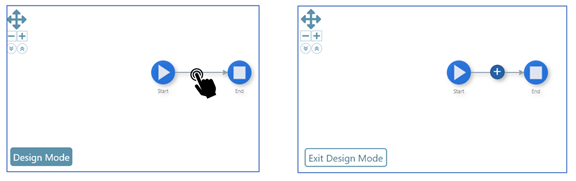
 We are now ready to add and create our Data Request. There are two ways to add a component to our orchestration, and that depends on whether or not we are in Design Mode. On the figure on the left, we are not in Design Mode. Double-click on the blue where you want the component to go. On the figure on the right, we are in Design Mode. Simply click on the “+” button.
 You can select the Data Request component and click on New.
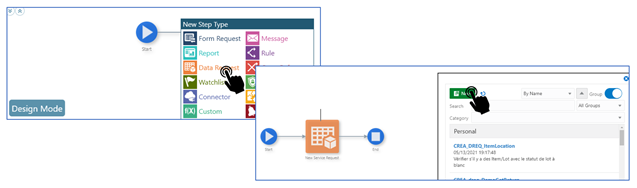 In the Data Request window, provide a request name, a description and a product code.
 Then we must enter the file/view name on which the request will be made. In this case, we will use V41021Q. We could also use the F41021 file, but the view only contains the necessary data. In order to display the file or view, click on the Load button.
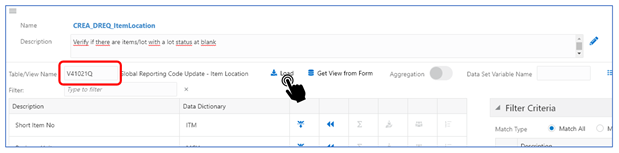 And now, we create the request. First, we will populate the fields that will act as filters for the request—more or less the equivalent of “where” in an SQL request. We add fields to the filter by clicking on
 ![]() in the list of fields on the left, then we add the item, cost center, lot, lot status, and location. Note that for the lot status, you need to enter a space character. You can change the name of the variables according to your needs.
in the list of fields on the left, then we add the item, cost center, lot, lot status, and location. Note that for the lot status, you need to enter a space character. You can change the name of the variables according to your needs.
Note that when the “Match All” radio button is ticked, it means all filter conditions must be met for the request to return values (similar to an “AND” request). When the “Match Any” radio button is ticked, it means that when at least one condition is met, the record is selected (similar to an “OR” request).
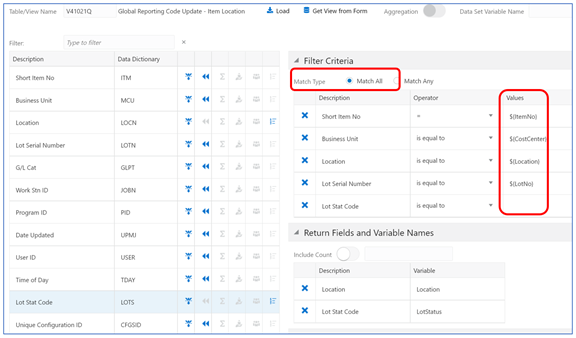 In order for the request to return values, they should be added by clicking on
 ![]() In this case, we want to receive the lot status and location.
In this case, we want to receive the lot status and location.
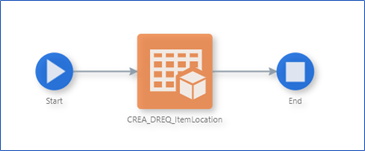
Save the request after it is completed. Our integration should look like this:
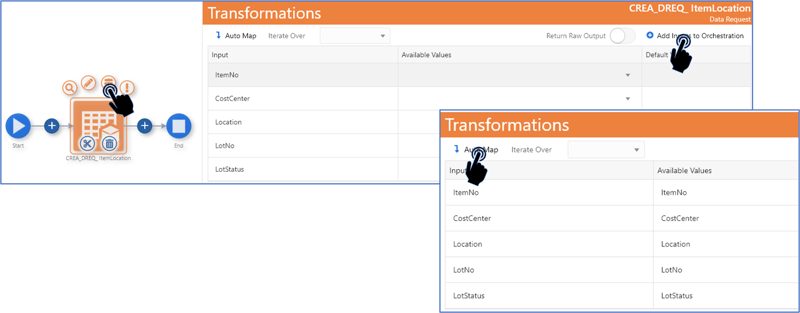
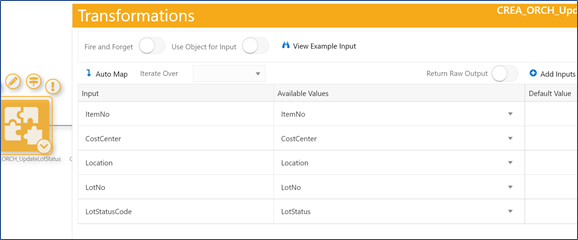
 The next step consists in assigning parameter values received by the orchestration to our Data Request. But prior to that, we will add parameters to our orchestration. Since our orchestration receives the parameters required for our Data Request, we will use the request to generate the parameters of the orchestration. Let’s call the Transformations area by clicking on
 ![]() and then on the “Add Inputs to Orchestration” button. Finally, we can perform an automatic mapping by clicking on the “Auto Map” button.
and then on the “Add Inputs to Orchestration” button. Finally, we can perform an automatic mapping by clicking on the “Auto Map” button.
 Save the request.
We will now test our Data Request.
 You need to enter values for your orchestration parameters. Check in your environment using the P41202 program. Note that the item number in the integration corresponds to the Short Item Number; it should be a numeric value.
 Confirm that you received the corresponding lot status (F41021_LOTS). With this first part of the integration done and tested, we can move on to the second part: changing the lot status to Quarantine—that is if we found our item, cost center, lot number and location.
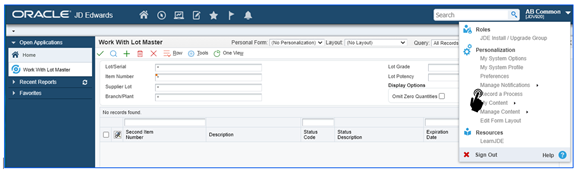
The first step is to record a transaction that consists in changing the status of a lot. To do so, we should log into JDE and call on application P4108. Once in the P4108 application, we will start the recording by clicking on “Record a Process.”
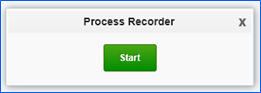
 To begin, simply click on the “Start” button and proceed with the transaction. In order to simplify the configuration of the Form Request, improve yourself with practice and take notes of the steps required to complete the transaction. You can also make changes in the configuration area of the Form Request. But the configuration will be simpler if the recording is performed without extra steps.
 Recording the transaction: enter the lot number, item, branch/plant, and click on the magnifier icon.
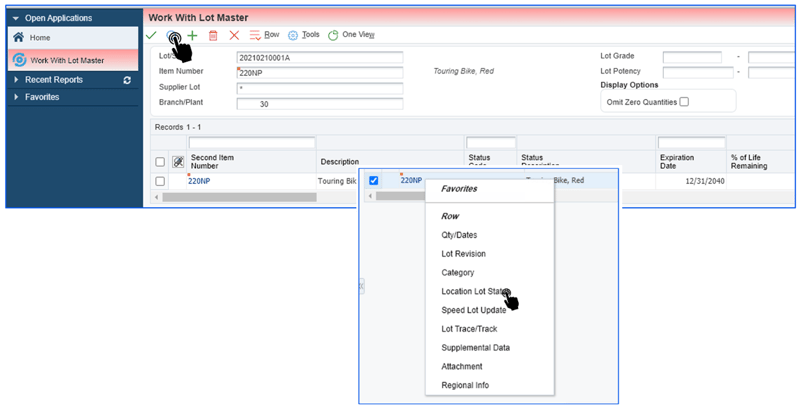 Select the line and click on “Location Lot Status.”
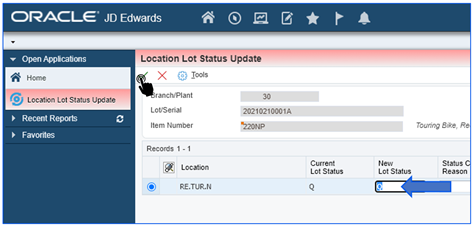 Change the lot status to the RE.TUR.N location by entering “Q” in the New Lot Status column, then click on
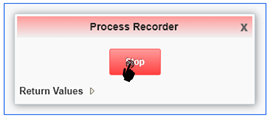
 ![]() to validate the change of status. Once that is done, you can stop the recording.
to validate the change of status. Once that is done, you can stop the recording.
 Save the Form Request.
 We will now improve the Form Request to make sure we only process lot statuses from the RE.TUR.N location.
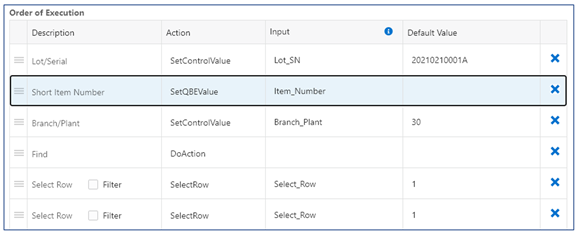
Click on Form Requests and open the request you just created. We will change the Item_Number field to the QBE field “Short Item Number.” We need to make this change since the only item number available in the Data Request is the Short Item Number.
 Then, go to step 2: Location Lot Status Update by clicking on “2.”
 We will add a filter to select only the lines with a particular location assigned. We will assign a variable to the filter that can be passed on as a parameter. Check the filter icon and click on
 ![]()
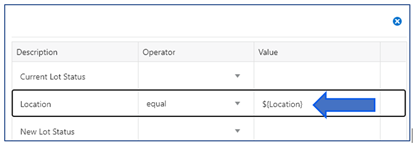
Add a variable that will be used by the “${Location}” location filter.
Save the Form Request.
 We will now create the orchestration that will receive the data and update the lot status field if empty. Click on the Orchestration button and create a new one.
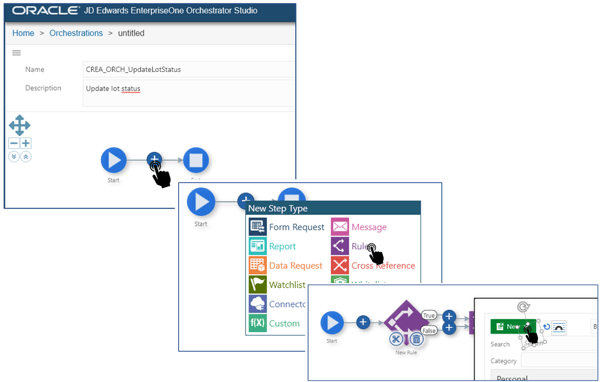
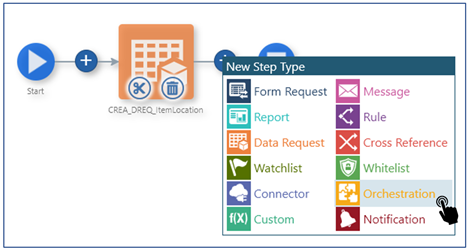
From the orchestration, we will add a rule to make sure we process only the lot statuses that do not return the “Q” value. Click on the “New” button and choose a standard rule.
We will create a general rule, meaning one that can be reused in several integrations. We will be testing if, when passed on, “Var1” equals “Var2.”
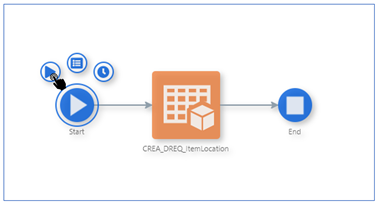
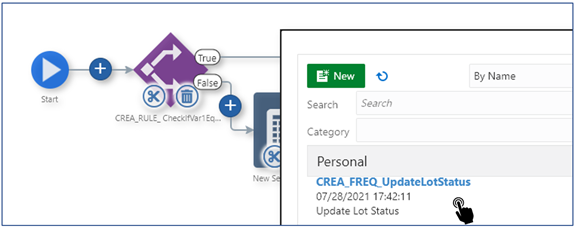
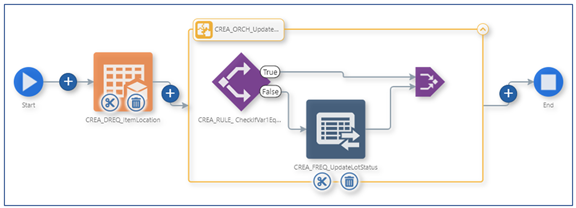
 If the rule returns “False” (meaning the value of the lot status is not “Q”), we will add the CREA_FREQ_UpdateLotStatus Form Request to update the lot status to “Q.” All you will have to do is map the different elements of our orchestration. Do not forget to save your changes.
 Choose the
 ![]() transformation tool in the Form Request component.
transformation tool in the Form Request component.
First, click on ![]() then perform an automatic mapping.
then perform an automatic mapping.
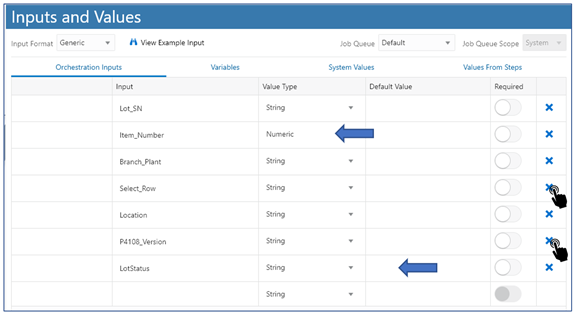
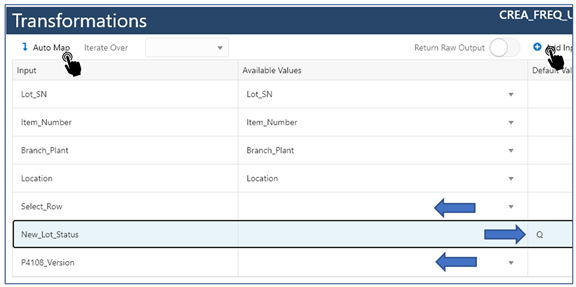 You will need to clear the “Select_Row” and “P4108_Version” parameters, and enter the default value “Q” in “New_Lot_Status.”

Along the same lines, we need to remove superfluous parameters from the orchestration (i.e., Select_Row, P4108_Version, New_Lot_Status), and create a new parameter for “Lot Status.”
Make sure that the “Item_Number” parameter is set at “Numeric.” Note that the parameters might not display in the same order. Save.
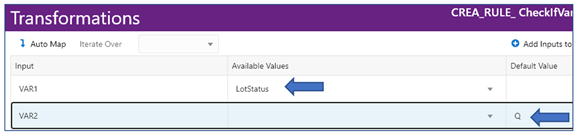
 In the CREA_rule_CheckIfVar1EqualVal2 rule component, select the transformation tool and map “LotStatus” to VAR1, and the default value “Q” to VAR2.
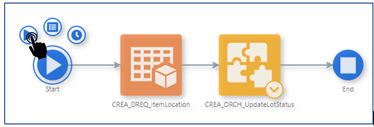
 Go back to the main CREA_ORCH_ReturnQuarantaine orchestration, add the CREA_ORCH_UpdateLotStatus lot status update, and perform the mapping.
 When you open the Orchestration component, the result should be:
 The last step prior to the end-to-end testing of our orchestration is to map the CREA_ORCH_UpdateLotStatus orchestration.
 Testing the Orchestration
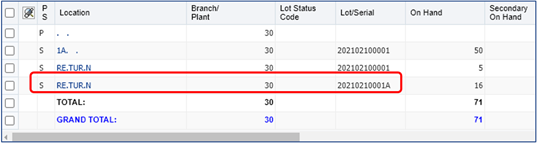
Find an item from the RE.TUR.N location whose status is not set at “Q.” If needed, you can clear the status using P4108.
Exectue the orchestration.
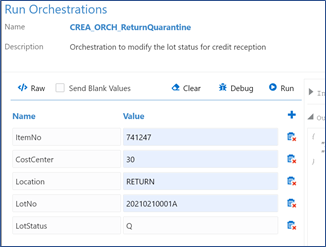
Enter your parameters. Make sure “NoItem” is a numeric value.
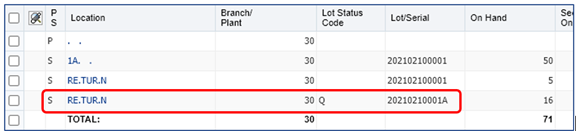 If all goes well, the lot status should display the “Q” value after the orchestration.
Link the orchestration to the P4205 | W4205K form by clicking on “OK”
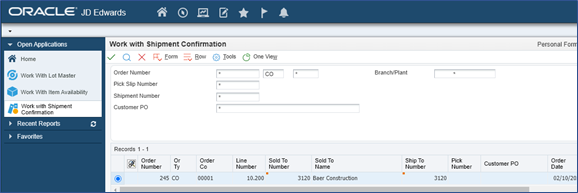
Use the P4205 program; you can run a credit search. Here, the document type is “CO.”
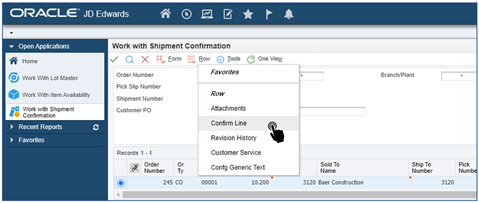
 You can access the confirmation function by opening the Row menu and selecting Confirm Line.
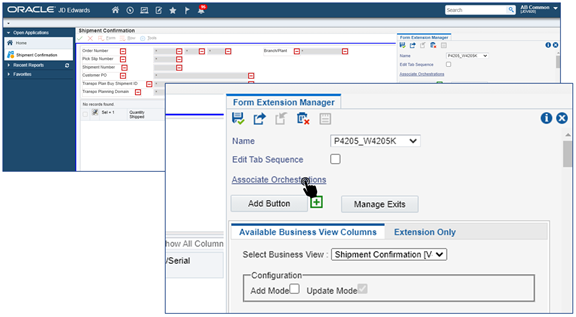
 We are now ready to create a Form Extension and link our orchestration to the “OK” button.
 Then we click on “Associate Orchestrations.”
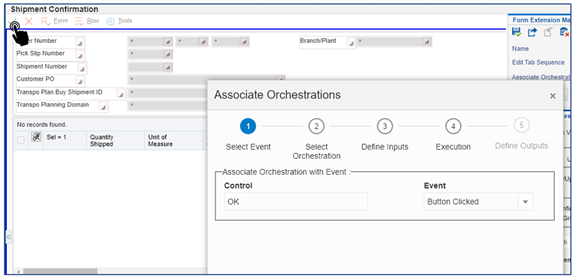
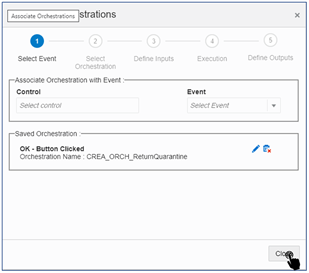
 First step: associate the orchestration with an event. To do so, click on
 ![]() and select the event that will trigger the orchestration. In this case, we will choose the Button Clicked event, meaning the orchestration will take place after the logic of the “OK” button.
and select the event that will trigger the orchestration. In this case, we will choose the Button Clicked event, meaning the orchestration will take place after the logic of the “OK” button.
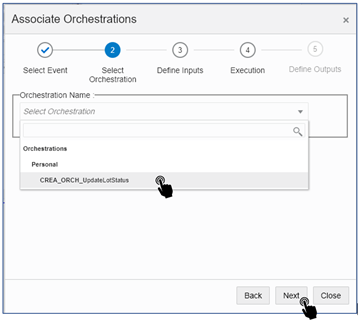
 Second step: select the orchestration to associate. You can enter part of the orchestration’s name to facilitate the search. This becomes relevant if you are juggling with many orchestrations.
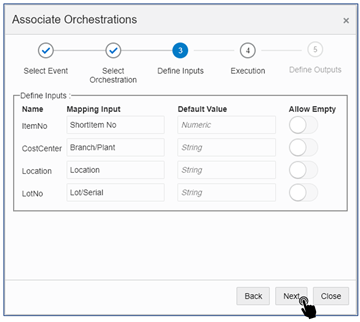
 Third step: associate the grid’s columns with the parameters of our orchestration. Note that the item number we want to associate is “JDE Numeric Item Number.” Click on the window of the field to be mapped, and then on the grid’s column.
 Fourth and last step: indicate whether the orchestration should be called before or after the logic of the event selected.
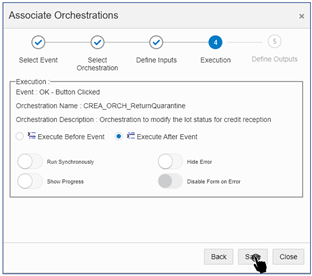 Save to complete the orchestration’s association. If everything went well, the following window should display:
 Voilà! We now have an orchestration ready to be called upon.
Here is a new way to add great functionalities to your installation via native JDE components, without changing the code. Orchestrator Studio helps in the considerable reduction of customization requirements. By automating tasks, you consolidate business processes while making sure business rules are followed. Do not hesitate to contact one of our experts for more information!
